
Toyota How to Measure a Steering Wheel
Measure your Toyota steering wheel in a minute, compare the result with the standard ranges, and see what diameter does to feel before you order a custom rim.
Read More →Guide · 10/19/2026
From the battery cable to the clock spring: how a Toyota steering wheel installation runs, the airbag steps that cannot be skipped, and the checks before a test drive.
A steering wheel swap looks like a twenty minute job and turns into a long afternoon when one step is skipped. The airbag, the clock spring and the shaft spline each punish impatience. This walkthrough follows Toyota steering wheel installation in the order a technician would do it. The safety steps matter on a Hilux, a Corolla and a Land Cruiser alike.
Set the wheels straight and leave the key out of the ignition. Photograph the rim from the driver's seat before anything moves, because the new rim has to sit on the same spline in the same orientation. A paint pen, a socket set, a torque wrench and a Torx driver cover most of the job.
Give the car time. A warm cabin softens the clips that hold the airbag cover, and a cold one makes plastic brittle. Working in a garage beats working in a street, since a dropped airbag module is a part nobody wants to reuse.
Disconnect the negative terminal first and set the cable aside so it cannot spring back. Then wait several minutes before touching the airbag. The pause lets the backup capacitor in the airbag circuit discharge, which is why the manual asks for it.
Keep the key fob away from the car while the battery is off. On a push button Toyota, a fob in a pocket can wake modules that should stay asleep. Tape the terminal end if the job will run overnight. Skipping the wait is the most common shortcut in a Toyota steering wheel installation, and the one a workshop never takes.
Look behind the rim for two small covers or two Torx screws, depending on the model. Corolla and Camry rims usually hide the fixings behind the side pods. A Hilux or Land Cruiser often uses spring clips that release with a thin probe.
Once the fixings are out, lift the module straight back and unclip the yellow connector. Yellow means airbag, and those connectors carry a locking tab that has to be released before the plug moves. Set the module face up on a soft surface, well away from the work area.
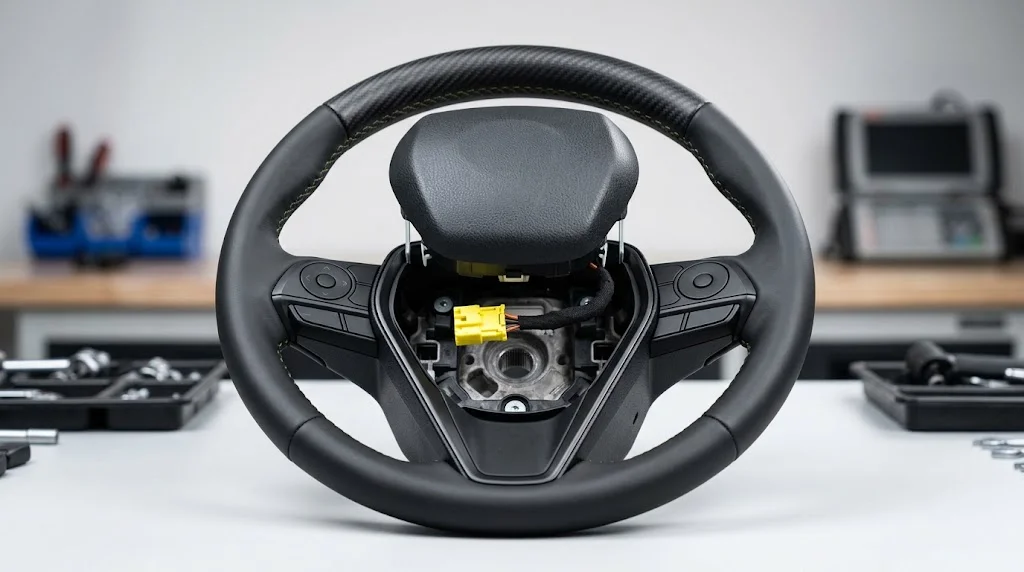
Hold the rim still while the nut is cracked, or the column will turn and load the lock. A second pair of hands on the rim is the simplest answer. A strap wrench works when nobody is free to help.
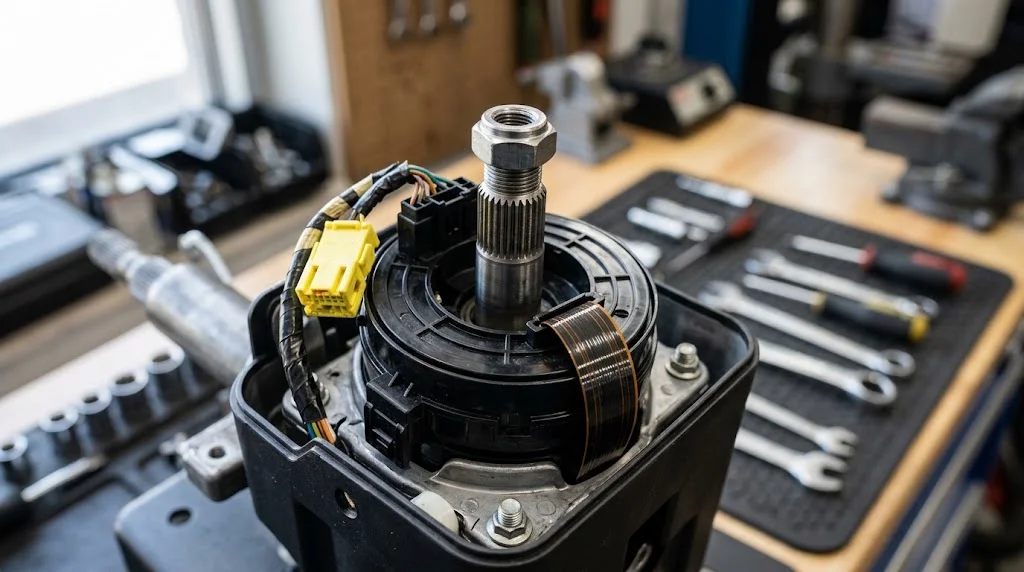
Leave the nut on its last threads while the rim is pulled. The habit stops a rim from coming off in a hurry, and it protects a face when the spline lets go suddenly. A rocking pull at nine and three frees most Toyota rims without a puller.
Draw a line across the shaft and the rim before the rim slides free. The spline has many positions and only one is correct, so the mark turns a guess into a check. Do the same on the new rim if it has not been marked at the workshop.
A rim that sits one spline off shows up as a crooked wheel on a straight road. Owners often blame the alignment for that, when the fault started at the install.
Slide the rim on with the mark lined up and the clock spring untouched. The clock spring sits behind the rim with a limited range in each direction, so it must not be spun while the rim is off. If it has moved, the car will throw a warning the moment the battery returns.
Run the nut down by hand first, then tighten in stages. Reconnect the yellow plug until the tab clicks, refit the module, and check that the horn pad sits flush on all sides. A proud corner means a clip is not seated.
Use the setting printed in the workshop manual for your chassis. Toyota lists a different figure for a Hilux column than for a Corolla, and a generic number from a forum is not a substitute. Tighten in two passes and hold the rim still on the second.
Two habits matter more than the figure itself. Never tighten the shaft nut with the steering lock engaged, and never use the rim as a lever to move the car. Either one can damage the lock or the column bearing, and neither is covered by a rim warranty.
Send the chassis code, the model year and a photograph of the rim face. Add one shot of the rear with the airbag out, taken before the rim is removed. The photo shows the airbag shape, the button pods and the connector layout in one frame.
Toyota changed the airbag and the button cluster within single model runs, so the year alone does not settle it. A Hilux Revo and a Hilux Vigo share a badge and little else behind the rim. A Corolla from two adjacent years can carry different pods. Grade matters as well, since a base car and a top trim often leave the plant with different parts.
Work through the list with the battery reconnected and the car parked. Every one takes seconds and catches a missed connector before the car is driven.
| Check | What to expect |
|---|---|
| Horn | Sounds from the pad without a hard press |
| Airbag lamp | Lights at key on, then clears |
| Multifunction buttons | Audio and phone respond as before |
| Cruise control | Sets and cancels from the rim |
| Paddle shifters | Shift on demand where fitted |
| Clock spring | No scraping through a full lock in each direction |
An airbag lamp that stays lit means the circuit is not complete. Switch off, disconnect the battery again, and check the yellow plug before anything else.
Most Toyota rim swaps need no programming at all, because the buttons and the airbag talk over the wiring that was already there. Reuse the factory module and the original connectors, and the car usually sees no change.
A heated rim is the exception. Where the car never had the option, the control and the circuit may be missing. The workshop then has to decide whether the function can be added. Since that varies by chassis and by market, we treat coding as a possible step and ask for photographs before quoting.
Most problems after a Toyota steering wheel installation trace back to the install rather than the rim. A clock spring turned off centre brings a warning. A plug not clicked home leaves the horn silent. A rim one spline off sits crooked. An airbag module set down face first can be damaged in a way that only shows at the next start. All of these are avoidable with the steps above.
Never probe the yellow connector with a multimeter while the battery is connected. Carrying the module by its connector risks a cracked latch. Store it face up on a soft surface, never face down. A module with visible damage or a torn latch does not go back into the car.
Switching the car on with the module loose on the seat is the worst habit in this job. The module can fire against nothing and be destroyed. A proper Toyota steering wheel installation keeps the module fixed before the battery returns.
Yes. The airbag circuit holds a charge for a short time after the cable comes off. That is why the wait matters as much as the disconnect.
In most builds the original module goes back in, inside a cover shaped for it. The car keeps the bag it was built with.
Only if a connector is not seated or the clock spring has moved. Recheck those before assuming a fault in the rim.
Not when the spline mark is used. A crooked rim after a swap points at the install, not at the suspension.
To the figure in the workshop manual for your chassis. The figure differs between models, and a forum number is not a safe stand-in.
The paddles will be there and may do nothing. Whether they work depends on the transmission control and the wiring in the car.
A rim takes ten to fifteen working days to build, plus fifteen to twenty days of shipping, which lands at twenty-five to thirty-five days.
Allow two hours for a first attempt and half that for anyone who has done one before. The battery, the airbag and the clock spring are the steps to slow down for.
Each rim is built for one chassis in our Guangzhou workshop, with the airbag cover shaped to the bag your car carries. Thirteen or more years of design and production sit behind the patterns. Material, stitch and shape stay your decisions. An aftermarket steering wheel does not automatically void a vehicle warranty under U.S. federal warranty law, but warranty coverage can still depend on whether the modification caused the specific failure being claimed. The federal remedy rules appear in 15 U.S.C. 2304, and the warranty-term rules in 16 CFR part 700.
Two pages on this site pair with this walkthrough. The Hilux guide covers the pickup range and its trim differences. The measuring guide settles the rim size before an order is placed. Every Toyota build we offer sits in the shop.
Send the chassis code, the grade and the two photographs, and we will confirm the build before anything is cut. A proper Toyota steering wheel installation starts with a rim that matches the car. The details above settle that match, not the model name. The catalog holds two entries. One is the Land Cruiser rim with paddle cut-outs. The other is the Nappa leather rim listed across the Corolla, Camry, Crown, Prius, Supra and RAV4. Fitment questions can go to the inquiry form or the contact page, and the Toyota brand page lists every chassis we cover.
Measure your Toyota steering wheel in a minute, compare the result with the standard ranges, and see what diameter does to feel before you order a custom rim.
Read More →How a Toyota paddle shifter upgrade works, from the GR Supra and GR86 to the Camry and RAV4: fitment, wiring, coverings and what to check before ordering.
Read More →How a heated steering wheel retrofit works on a Toyota, from the Camry and RAV4 to the Corolla: wiring, switches, coverings and what to check first.
Read More →